")


The holiday season is upon us and that can only mean one thing: it’s time for our annual Countdown to Christmas activities!

This is such a magical time of year, even more so when you can witness it through the eyes of a child. Now that my kids are getting a little older it’s so important for me to make the holidays extra special for them.
This countdown to Christmas activities packet is filled with 24 days of fun activities, crafts, and treats that your child is sure to love! I have made things as easy as possible. In this post, I walk you through each day’s activity along with step-by-step instructions, lists of materials, and links to everything you might need.
I have also included a countdown to the Christmas guide in the packet which has everything you need all in one place.

Where to Start
- Begin by downloading and printing out the COUNTDOWN TO CHRISTMAS GUIDE.
- Cut out the 24 activity cards and prep them for use. You can either string them up to display in your house or put them in an advent calendar so your child can pick one activity out each day.
- In the back of the pack, you will find a complete list of all the materials you will need listed out by day. Many of the supplies you probably already have on hand, but I have provided links throughout this blog post for your convenience.
- Each day in December your child will complete the activity listed on the corresponding activity card. You can choose to let them do just a few activities or all 24.
December 1: Write a Letter to Santa
What better way to kick off December than by writing a letter to Santa! Depending on the age of your child I am including three different templates.
If your child is old enough to write, they can use the lined letter to write thier note. In need of a little assistance? The fill in the blank one is the way to go. Finally, if your child is really young like mine, use the third one and have them draw a picture of what they want for Christmas.


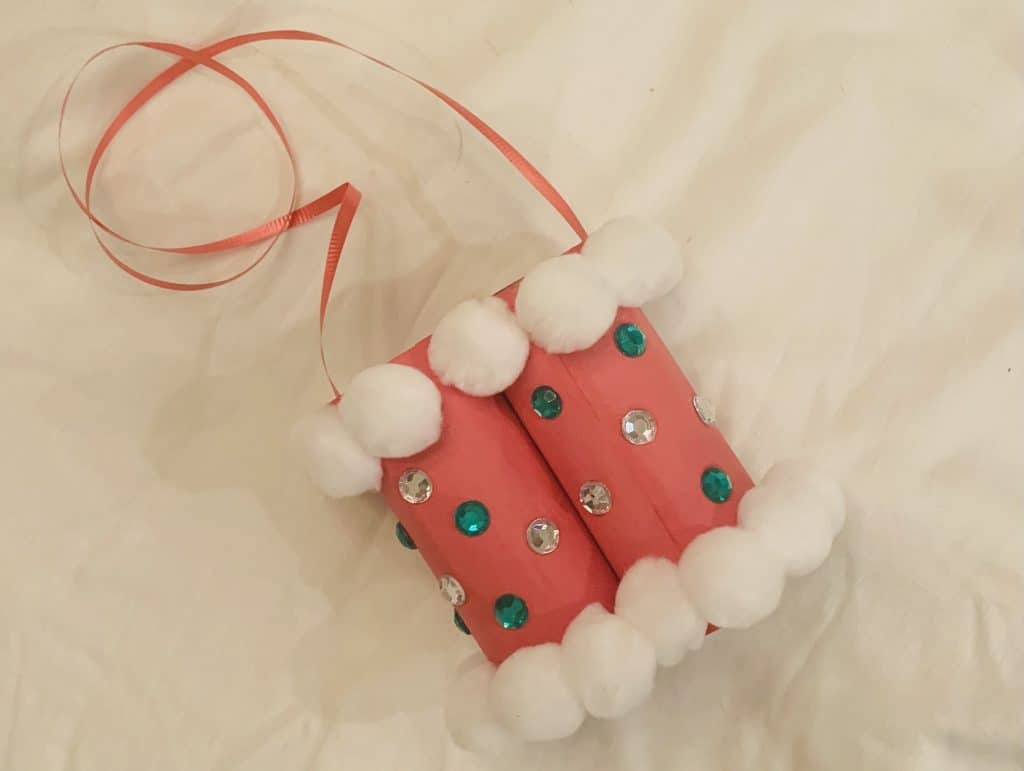
December 2: Make Santa Searchers
Today we are making these cute binoculars- aka “Santat Searchers.” Your child can use these to search the night sky for Santa on Christmas Eve.
For this craft, you need 2 empty toilet paper rolls, scissors, glue, construction paper, and string. You can also add any embellishments or decorative items you have lying around. I pulled out our craft box and found so many fun items to use.

To make your Santa Searchers, follow these instructions:
- Wrap each roll of toilet paper in red or green construction paper.
- Decorate them with embellishments as you wish. You can also draw on them with markers if you don’t have embellishments.
- Next, glue the two rolls together to make them look like binoculars.
- Finally, attach the string so it can hang around your child’s neck.
December 3: Make a Paper Snowflake
Growing up, I used to love making paper snowflakes. This is such a quick and easy craft that your child is sure to love. The best part is that you only need paper and scissors. You can always jazz the snowflakes up with a little glitter if you would like!

If you aren’t sure how to make a paper snowflake, you can find easy-to-follow step-by-step instructions here. I love that the kids can make as many snowflakes as they want that will all look different!
December 4: Watch a Christmas Movie
There is nothing better than snuggling up on the couch during the holidays to watch a Christmas movie. I could do this every night with my family, but it’s especially perfect at the end of a long week.
You can usually find good movies to stream on Netflix or Hulu, and we also have a few on DVD. Here are some of my all-time favorite Christmas movies for kids. To get some ideas for adult movies check out MY must-watch holiday movies here!)

December 5: Fingerprint Christmas Lights
This adorable fingerprint Christmas lights craft will be one you will treasure for years to come. It is super easy and not very messy.
All you need for this activity is paper (I love this large easel-size paper), washable paint, and a marker. Follow these instructions to make this craft:
- Use the marker to draw a string for the lights on a sheet of paper. You can make it any design you would like…loopy-loop, zig-zag, or even your child’s name.
- Dip their finger in paint and have them fingerprint colorful “lightbulbs” throughout various sections of the string.
I plan on framing the ones my kids make and using them as Christmas decor each year.

December 6: Make an Edible Christmas Tree
For today’s countdown to Christmas activity, your child gets to make a Christmas tree…that they can then eat! This one is sure to be a hit!
To make these edible Christmas trees you will need either classic waffle cones or sugar cones, green icing, and red and green candy of your choice (M&Ms, Skittles, sprinkles, Twizzlers, etc.)
- Place the cone standing upside down on a plate.
- Cover the cone with green icing.
- Decorate it with red and green cand of your choice
If you need inspiration on how to decorate yours, check out these Pinterest search results for lots of ideas.
December 7: Wrap a Toy for Charity
Today it’s time to teach your little one that Christmas is about giving. Have them pick out a toy (or two) that they no longer play with or take them to the store to buy a new one.
Next, get them to help you wrap the gift. Finally, donate it to a church, charity, or child in need. This is a tradition that I hope to continue with my kids for years to come.
December 8: Have a Candy Cane Hunt
If your child is anything like mine they will make a hide-and-seek game out of anything! Grayson LOVES Easter egg hunts, so we try to find a way to incorporate the idea into every holiday.
What better way during the Christmas season than to have a candy cane hunt! All you need is a bag of candy canes (I like these mini ones) and a bag or bucket for your child to use when collecting them.
Hide them around the house, put on some Christmas music, and let them go on a candy cane hunt. This activity will keep kids entertained for a while! You can also use this opportunity to practice counting, too! After they are finished let them eat one candy cane as a treat for working so hard!
December 9: Make a Cotton Ball Snowman
Frosty the Snowman is such an iconic part of Christmas. It is only fitting that today your child creates their very own cotton ball snowman.
For this craft, the snowman body and snowman pieces are included in the packet. All you need is construction paper, cotton balls, scissors, and glue. To make the snowman follow these simple steps:
- Cut the snowman’s body out and glue it to the center of a piece of construction paper.
- Glue cotton balls on to fill in the entire snowman.
- Cut out the remaining parts of the snowman from the template. You can use them as is or trace them on your desired colors of construction paper.
- Attach the pieces with glue to give the snowman a 3-D look.
- Finish it off by letting your child decorate the background of the picture.

December 10: Make and Send a Christmas Card
One of the best things about the holidays is getting cards from friends and family. This year especially, since we can’t have large gatherings, it is so important to spread holiday cheer however we can.
Today your little one will make a Christmas card and mail it. You can get as creative as you want or keep it sweet and simple. They can use a sheet of paper and some crayons, glitter, embellishments, or even attach a picture.
When they are finished help them address the letter to a friend or family member and stick it in the mailbox to be sent off.
December 11: Look at Christmas Lights
What kid doesn’t love Christmas lights?! I have great memories from childhood of going to different neighborhoods during the holidays and looking at lights. There was one house near us that even had live reindeer…so magical!
This activity requires no prep and can be completely free if you want it to be! Take a walk around your neighborhood after dinner or load the family in the car for a trip around town. You may even have famous local attractions that are known for their Christmas lights like Christmas in the Oaks in New Orleans.
December 12: Make Christmas Slime
Grayson loves making and playing with slime, so why not sprinkle in a little holiday cheer to an activity most kids already love. To make Christmas slime all you need is Christmas confetti, Elmer’s Glue, saline solution, baking soda, and water. You can even throw in glitter or food coloring if you want.
To make slime, follow these instructions:
- In a bowl mix 1/2 cup glue with 1/2 cup water
- Add in Christmas confetti, food coloring, and/or glitter
- Mix in approximately 1 teaspoon of baking soda
- Add 2 tablespoons of contact solution
- Use your hands to mix the slime until it gets to the right consistency ***If it is too sticky, you may need to add more contact solution
December 13: Make Reindeer Chow
Today we are making a festive version of puppy chow aka reindeer chow. This yummy treat is great to put out around your house or to give as a gift during the Christmas season.
There are many different versions of this recipe, but I am linking one I love from Eating on a Dime here.
December 14: Make Christmas Crayons
What kid doesn’t like to color? Today we are putting a spin on the traditional crayons and making them into Christmas-themed ones!
To make these all you need are crayons (they can be old and broken) and a Christmas-shaped silicone mold. Here are the instructions to make the crayons:
- Make sure all the paper is removed from the crayons.
- Break the crayons up into small pieces and fill up the mold.
- Bake them at 275 degrees for 10 minutes.
- Allow the crayons to cool completely before taking them out of the mold.
December 15: Color a Christmas Picture
Today your child gets to use the colors they made yesterday to color a Christmas picture. Included in the packet are five different coloring pages: Santa, Santa’s sleigh, a Christmas tree, a snowman and ornaments.
Let them color one picture or all five and display them around your house!
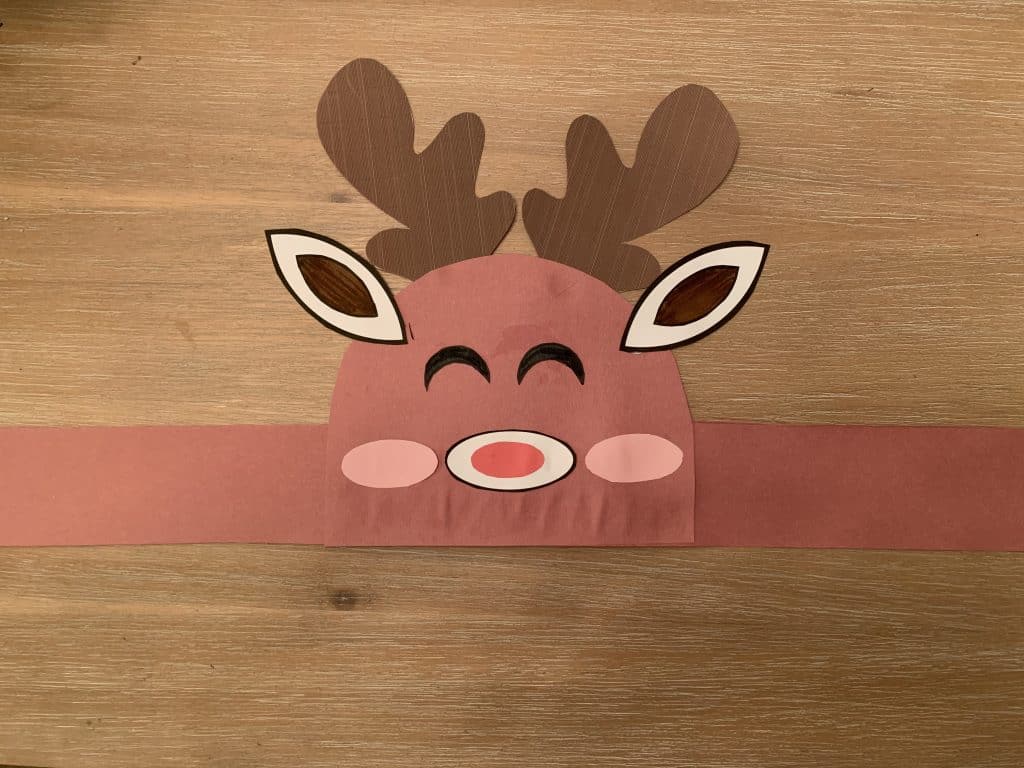
December 16: Make Reindeer Headbands
Another classic Christmas character is Rudolph. Today your child gets to make a reindeer headband that he or she can wear during the holidays!
For this craft, you need the reindeer printable, which is provided in the countdown to Christmas activites packet construction paper, scissors, and glue. To make the headband follow these simple steps:
- Using brown construction paper, measure and cut a strip to use as the band that will go around your child’s head. You may need to tape or glue two strips together depending on how big the head is.
- Cut out the pieces from the printable to use as a stencil. You could also color them if you don’t have construction paper.
- Trace the face and pieces of the reindeer on the correct colored paper.
- Cut out each piece and assemble it with glue. (Refer to the picture below.)
December 17: Make Fake Snow
I’m not going to lie…I’m as excited about this activity as the kids because it looks like so much fun. Since we live in the South, we rarely get to experience real snow, so today we are going to make our own!
To make fake snow you only need two ingredients: baking soda and shaving cream. Follow these instructions to create your own winter wonderland:
- Pour 1lb. of baking soda into a big container.
- Add in the shaving cream (a handful of shaving cream and mix. You may need to add more to get the right consistency.
You can add small Christmas objects to the snow and have your kids play with it (as they would with a sandbox). Such a fun winter activity!
December 18: Make S’mores and Hot Chocolate
Who doesn’t love s’ mores and a cup of hot chocolate in the cold winter months? I know I do just as much as my kids.
I’m sure you’re familiar with how to make a s’more, but just in case you aren’t you will need graham crackers, marshmallows, chocolate, and marshmallow roasting sticks. Follow these instructions to make the s’more:
- Place a marshmallow on the roasting stick and carefully hold it over an open flame. We love to build a small fire, but you can easily use a gas stove…just be safe!
- Assemble the s’more like a sandwich using two graham crackers on the outside and the hot marshmallow and chocolate piece on the inside.
You now have a scrumptious treat to enjoy with some hot chocolate. I personally use Swiss-Miss instant, but if you want to get fancy and make your own then go for it!
December 19: Make a Handprint Wreath
This handprint Christmas wreath is another craft that you will treasure for years to come. To make this all you need is green construction paper, red pom-poms, and a bow or ribbon. Follow these instructions to make the wreath:
- Trace your child’s hand on a sheet of construction paper
- Cut it out and use this as the template to create as many hand cut-outs as you would like (the more you make the larger your wreath will be)
- If you have more than one child you can alternate the handprints
- You can also alternate the shades of green you are using
- Assemble the wreath by attaching all the hands in a circular shape with glue
- Finally, glue on the red pom-poms (to look like holly) and the bow to decorate the wreath
You now have a priceless Christmas craft that you can display in your house each year during the holidays.
December 20: Make a Gingerbread House
When I think of Christmas activities for kids, making a gingerbread house is one of the first things that pop into my head.
I like to make things easy on myself and just buy a gingerbread house kit, but you can buy all the individual supplies if you would rather do that. Let your child be creative and have fun decorating (and eating!) the house!
December 21: Read a Christmas Book in Matching PJs
While I’m sure you’ve been reading Christmas books all month long, tonight make a special effort to put your kids in matching jammies and read their favorite holiday book!
We love to buy one or two new Christmas books each year to add to our collection. Here are a few of our favorites:
December 22: Have a Dance Party to Christmas Music
With only three days to go until Christmas, these kids are bound to be wild! Tonight it’s time to get all that energy out before bed. Turn on some Christmas music and have a dance party in the living room!
December 23: Make Reindeer Food
A tradition that we started with Grayson last year is sprinkling food in the yard for Santa’s reindeer on Christmas Eve. It is so fun to wake up on Christmas morning and see that they have eaten all the food.
Today your child will make their very own batch of reindeer food that they can sprinkle in the yard on Christmas Eve.
Ingredients:
2 cups raw oats
red and green sprinkles about 1 TB
birdseed
Combine all the ingredients into a ziplock bag and sprinkle on the ground on Christmas Eve.
December 24: Bake Cookies for Santa
We’ve made it to Christmas Eve! No better way to celebrate than by baking cookies for Santa. You can keep this quick and easy with ready-to-bake chocolate chip cookies or store-bought Oreos. Or, you can get fancy and bake cookies from scratch!
Here are links to three of my favorite Christmas cookie recipes:
Sugar Cookies ***You can use this giant cookie cutter to quickly cut out many cookies at once. If you want to make your own icing, this recipe is an easy one
Whichever cookie your child decides to leave out, I’m sure Santa will enjoy eating them!

I hope you and your family have so much fun participating in this countdown to Christmas activities. I’d love it if you shared this post with any other mamas you know!
This post was all about Countdown to Christmas Activities.
Wishing you and your family a wonderful holiday season!


Be the first to comment